Quantcast
Channel: Bead Origami
Viewing all 139 articles
Browse latest View live

Garden Jewel Necklace in Beadwork Magazine

$
0
0
My third Designer of the Year project for Beadwork Magazine is now available in the June/July 2015 issue.


The Garden Jewel Necklace features a great big Swarovski crystal bezeled with a collection of Miyuki Tila beads, drop beads, and round Japanese seed beads. A beaded spiral rope matches the focal pendant, and several beaded beads reminiscent of the Dewdrop beaded bead design string onto the rope for added texture.


The beaded beads will just fit over the spiral rope, yet they will stay in place once strung, so they can be positioned at different points on the rope for several different looks. In this purple and green version they sit close to the pendant:


And in this silvery purple version they are distributed more evenly throughout the rope:


A limited number of kits for this project are available on my website at beadorigami.com. The pattern for this design is available in the June/July 2015 issue of Beadwork Magazine. Please note that I'll soon be traveling to the 2015 Bead & Button Show, and the last day to order kits for shipment before the show is June 1. Any kits ordered after June 1 will ship on June 9.

Thanks for looking!

2015 Toho Challenge Necklace

$
0
0
This year I was invited to participate in the 2015 TOHO Challenge, a beading challenge put on by the Japanese seed bead manufacturer TOHO Beads. Each participant was given the same set of Japanese seed beads and Czech beads to create a finished piece of beadwork. We didn't need to use all of the beads in the challenge kit, but we couldn't add any additional beads except for findings and stringing materials (with the option of including one extra focal piece). All the challenge pieces are on display at the 2015 Bead & Button Show, and after that they will travel to Japan where they will be on display for a year.


I was stoked to receive the challenge box because they included colors that I already love and use in my beadwork; gorgeous magentas, bronzes, and rich metallic greens. For the challenge piece itself I wanted to create something representative of my signature style, and I also wanted to play with a relatively unused stitch. I went for a more everyday-wear look rather than anything over-the-top, and I ended up with this simple but elegant necklace.


The round focal uses the geometry of an icosahedron, so it has 30 edges and 20 triangle-shaped sides. The edges are represented by 2-hole tile beads while a collection of magmata and mini dagger beads sit on each side, in a manner similar to that of my Tila Garden Pendant. But unlike the Tila Garden design, this focal is self-supporting without the use of a round core bead, though it did require some extra engineering to keep this beaded ball from being squishy.

Since the focal is hollow, it could be strung on a headpin or through beading wire as a beaded bead, but I instead elected to attach it to a beaded rope.


I wove the rope using twisted cubic right-angle weave (CRAW), using primarily green beads to set off the magenta and bronze beads in the focal. The twisted CRAW technique is a versatile stitch that can make a variety of ropes, bangles, and components, but it seems to intimidate everyone I describe it to. It's actually much more meditative and easier than CRAW once you get the rope started (no, really!), and I'm looking forward to exploring this stitch further. In this piece I wove it in both the right-handed and left-handed directions so that each side of the rope is symmetrical with the other side, and both sides meet in the middle in a novel join. I also had fun incorporating fire polish beads into this beaded rope, which become more prominent closer to the focal of the piece.


The clasp is a little beaded toggle that mimics the triangular shape of one of the sides of the focal. I sometimes elect for a metal clasp over a beaded clasp primarily due to time constraints, especially if it's a piece that I will need to illustrate for a beading pattern. There are definitely advantages and disadvantages to each clasp approach, but for this piece I was able to use a beaded clasp which nicely complements the focal of the necklace.


If you'd like to see the 2015 Toho Challenge pieces in person, please visit the display case near the registration desk at the Bead & Button Show. Keep an eye on the Team Toho page for more images of the challenge pieces as well.

Thanks for looking!

Artist Profile in Bead & Button Magazine

$
0
0
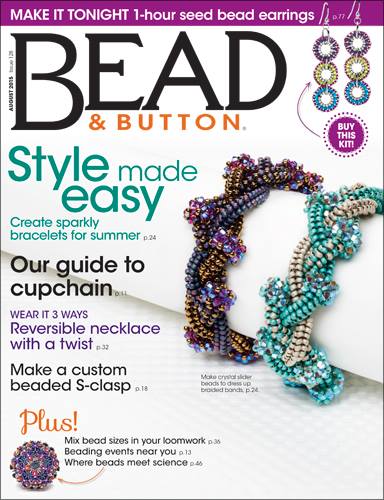
If you've seen the August 2015 issue of Bead & Button Magazine, you might have noticed a cameo appearance of a Magic O Ball beaded bead on the cover.


Well, that's because I'm featured in this issue's Artist Profile on pages 46-47. It's an honor and it was a pleasure to be interviewed about my work and my artistic and scientific journey. (Though, it's rather surreal to read about myself from a third person point of view!)


I'm doubly honored that the Bead & Button editors found my own photos of my work fit to print. Generally, I try to optimize my photos for web viewing, so I was pleased that they turned out well in print too. They chose several of my geometric designs, such as the above Fiberoptic Dodecahedron beaded beads, and several of my chemical designs too.

I've gotten a couple of questions about the beaded chemical structures featured in this article, so I'd like to do a quick summary of them here. The golden necklace shown below features the chemical structures of the Serotonin and Dopamine molecules, which are neurotransmitters (i.e. chemicals that work with neurons) that have a couple of functions in your brain. Serotonin contributes to feelings of happiness and dopamine contributes to feelings of pleasure and satisfaction.


This necklace uses seed beads, jump rings, and a simple clasp, and the technique used to create it is a variation on Gwen and Florence's Infinity Weave. The advantage of this technique is that it results in flat but supported beaded structures, which are perfect for serotonin and dopamine because these molecules are mostly flat in real life. The beading pattern and kits for this piece are available on my website.

The endorphins are also neurotransmitters, and they're also feel-good molecules. Unlike serotonin and dopamine, endorphins are a type of protein and they're significantly larger and have much more dimensionality, though they're still on the small side as far as proteins are concerned. There are a couple of different types of endorphins, and the specific structure shown in the magazine is the necklace-length alpha-endorphin.


I created this piece with crystals, bugle beads, and seed beads to accurately reflect not only the atoms in an alpha-endorphin molecule, but also the different types of bonds and its dimensionality as well. I entered this piece into the 2013 Bead Dreams competition (where it made the finals!)


The technique behind this piece uses a combination of specific, redundant thread paths and thread tension to mimic the 3D structure of the molecule. While I've applied this technique to other 3D molecular structures, I've yet to come up with the best way of explaining how to create the Endorphin Necklace. I like using a detailed, step-by-step writing approach for my beading patterns, however this isn't a feasible approach for a piece as complex as the Endorphin Necklace as such a pattern would be hundreds of pages long. A more streamlined method of explaining the technique may work, but it would be best-explained in the context of a collection of beaded molecules. Either way, it's something that I will have to carefully consider in the future.

In the meantime, if you'd like to learn more about this technique, I have written a pattern for the smaller ethanol molecule, which is the molecule of interest in alcoholic beverages. I paired them with a variety of fruit charms for a pair of earrings that can be made to match your favorite cocktail. The pattern and kits for the Cocktail Hour Earrings are available on my website.


Thanks for looking!

New Beading Video: Weaving Beaded Beads with Two-Hole Beads

$
0
0
A few months ago I had the opportunity to film a series of videos based on four different areas in beading. The videos are now available at the Interweave Store both as instant high definition video downloads as well as in the DVD format. This is the first in a series of four blog posts on those video projects.

Together with the team over at Interweave/F+W, we organized these videos with each level of beader in mind. Beginners can watch me weave each step of the project one stitch at a time, I share several variations for experienced beaders, and throughout the course of each video I include many tips and tricks that are useful for beaders of all levels. If you're new to my Bead Origami style then these videos are a great introduction to my approach to beadweaving, but if you're already familiar with my work then you'll want to check them out too as I cover a new project in each one.


In the first video I talk about how to weave beaded beads using peyote stitch and two-hole beads. I expand on the idea I explored in the Double Pinwheel beaded bead pattern and apply it to other shapes, starting with the 2-hole bar beads.


The 2-hole bar beads combine with Japanese seed beads and round core beads to make elegant little beaded beads that remind me of tiny baskets. I cover how to make both the basic beaded bead, as well as how to modify the design to make it in three different sizes.


I also describe how to make the Double Pinwheel beaded beads using 2-hole triangles, and how the shape of this bead is less symmetrical than other 2-hole beads which makes a big difference as you add each triangle to the beadwork. For another, simpler variation, I talk about how Half Tilas easily substitute into these beaded beads in place of the 2-hole bar beads.


Experienced beaders will want to check out the sections on the handedness of these beaded beads, and my attempt at weaving this design using SuperDuos. I discuss my approach to incorporating SuperDuos into this design, the result, and what I might do to change that result in future attempts.

This video is available both as a High Definition Video Download and in the DVD format, and includes a supplementary PDF pattern with step-by-step written instructions and a complete materials list for the necklace and earrings shown here.

Thanks for looking!

New Beading Video: Geometric Beaded Beads, From Cubes to Dodecahedrons

$
0
0
A few months ago I had the opportunity to film a series of videos based on four different areas in beading. The videos are now available at the Interweave Store both as instant high definition video downloads as well as in the DVD format. This is the second in a series of four blog posts on those video projects; check out the previous post on working with 2-hole beads here.

Together with the team over at Interweave/F+W, we organized these videos with each level of beader in mind. Beginners can watch me weave each step of the project one stitch at a time, I share several variations for experienced beaders, and throughout the course of each video I include many tips and tricks that are useful for beaders of all levels. If you're new to my Bead Origami style then these videos are a great introduction to my approach to beadweaving, but if you're already familiar with my work then you'll want to check them out too as I cover a new project in each one.


The second of these videos focuses on a topic near and dear to my heart; geometric beaded beads.


When I was putting together this video, I asked myself: "if I could teach a beginning beader the fundamentals of geometric beaded beads, what would I cover?" I started outlining this video on how to weave the five Platonic Solids, and I still give a brief lesson on what makes these particular forms so interesting, but after thinking about it and receiving some insightful feedback I decided to focus the beading portion of the video on cubes and dodecahedrons and an important variation on each form.

There are several different ways to make beaded beads using these basic geometric forms, and many different beaders have explored these forms over the centuries (Valerie Hector's research in The Art of Beadwork indicates that Chinese beaders have been making these beaded beads since at least the 15th century). I cover both the basic cube and the dodecahedron using the single-needle, cubic right-angle weave (CRAW) approach with sparkly bicone crystals, and I explain each stitch to fully show each step of the process.


In the next part of the video I show how to weave a cube beaded bead with corner-cover beads. In this variation, we weave the structure using both bicone crystals and seed beads to give us seed beads at each corner. The advantage of adding these beads is that they protect the threads that can show at the corners, and they give us points where we can further embellish the beaded bead.

A pair of these beaded beads makes a quick, delicate pair of earrings.


The section on dodecahedron beaded beads with corner-cover beads is the most challenging part of the video, but I think it's one of the most useful techniques to master. Adding this form to your stitch repertoire will give you a strong foundation to tackle more advanced embellished beaded beads.


For a neat pendant using just this one thread path, I created three beaded beads in different sizes using a simple bead substitution...


...And then I wove them one by one, enclosing the smallest inside the medium inside the largest structure for a dodecahedron, inside of a dodecahedron, inside of a dodecahedron. It's three dodecahedrons in one!


A collection of cube and dodecahedron beaded beads pair with round crystal pearls for a very sparkly necklace.


Experienced beaders will want to check out the sections on bead type variations, and the summary of several advanced designs that use these beaded beads as a base.

This video is available both as a High Definition Video Download and in the DVD format, and includes a supplementary PDF pattern with step-by-step written instructions and a complete materials list for the beaded beads, necklace, and earrings shown here.

Thanks for looking!

New Beading Video: Stitching Beaded Molecules

$
0
0
A few months ago I had the opportunity to film a series of videos based on four different areas in beading. The videos are now available at the Interweave Store both as instant high definition video downloads as well as in the DVD format. This is the second in a series of four blog posts on those video projects; check out the previous posts here and here.

Together with the team over at Interweave/F+W, we organized these videos with each level of beader in mind. Beginners can watch me weave each step of the project one stitch at a time, I share several variations for experienced beaders, and throughout the course of each video I include many tips and tricks that are useful for beaders of all levels. If you're new to my Bead Origami style then these videos are a great introduction to my approach to beadweaving, but if you're already familiar with my work then you'll want to check them out too as I cover a new project in each one.


The third video in this series combines two of my favorite topics: beadwork and chemistry!


I start the video with a little lesson in organic chemistry (don't worry: there's no test at the end!). I give a brief overview about the atoms that make up molecules found in living things and how those atoms are connected together to make molecules. I also talk about different ways to visualize or render molecular structures, from 3D renders that show the dimensionality of the molecule to the shorthand skeletal structures that form the basis for the beadwork in the video. I also review several of the beaded molecules that I've already covered in patterns on my website (such as caffeine, serotonin, and dopamine), and I explain why these "small molecules" are ideal for this specific method of making beaded molecules.

The main molecule that I focus on in this video is L-ascorbic acid, otherwise known as vitamin C. Vitamin C is an antioxidant small molecule made up of six carbon, eight hydrogen, and six oxygen atoms, and it's also notable for having chirality; it's the counter-clockwise or left-handed version of a pair of molecules that have the same structure but are mirror images of each other. As is the case with many organic molecules, only this left-handed version is biologically significant, and it acts as a cofactor in at least eight different enzymes that serve a variety of important biological functions. To keep the beadweaving simpler, we ignore the chirality as well as the hydrogen atoms in this beaded version of vitamin C, but being a stickler for such things I felt the need to point out the importance of chirality in molecular structures anyway ;).


After I show how to weave the beaded vitamin C molecule, I also demonstrate how to stiffen the molecule using a clear acrylic floor finish. It's a technique pioneered by Diane Fitzgerald and Jean Cox for firming up and supporting finished beadwork. Once called Future Floor Wax, it's now called Pledge Floor Care with Future Shine, but whatever the name it makes the finished beaded molecules stiff and supported.

With a few jump rings, a handful of drop crystals, and little bit of chain, a pair of these molecules make lovely chandelier-style earrings. I wove them in red and silver for a berry-flavored version, and I also made a grape-flavored pair in purples in greens.


Finally, this golden version uses smaller seed beads and a variety of colors of crystals for a more delicate, brighter variation.


This video is available both as a High Definition Video Download and in the DVD format, and includes a supplementary PDF pattern with step-by-step written instructions and a complete materials list for the pair of red and silver earrings shown in this post.

Thanks for looking!

New Beading Video and Kits: Dainty Prismatic Right-Angle Weave Flower Charms

$
0
0
A few months ago I had the opportunity to film a series of videos based on four different areas in beading. The videos are now available at the Interweave Store both as instant high definition video downloads as well as in the DVD format. This is the last in a series of four blog posts on those video projects; check out the previous posts herehere and here.

Together with the team over at Interweave/F+W, we organized these videos with each level of beader in mind. Beginners can watch me weave each step of the project one stitch at a time, I share several variations for experienced beaders, and throughout the course of each video I include many tips and tricks that are useful for beaders of all levels. If you're new to my Bead Origami style then these videos are a great introduction to my approach to beadweaving, but if you're already familiar with my work then you'll want to check them out too as I cover a new project in each one.


For the last video I focused on a topic that often shows up in my work; stitching beaded flowers using Prismatic Right-Angle Weave (PRAW).


Stitching Flowers with PRAW


Last spring I put together a webinar on Prismatic Right-Angle Weave where I talked about the geometry behind the term, and I showed several different examples of beaded art that use this technique. I also explained how to stitch four different kinds of basic PRAW beaded ropes in a detailed supplementary PDF file, which was then adapted into an article for the August/September 2015 issue of Beadwork Magazine.

In this video I talk about how to use PRAW to make dainty beaded flowers using a collection of shaped beads and seed beads. I start with a brief review of PRAW, and then I show how to weave three different sizes of these flowers using PRAW-4 (CRAW), PRAW-5, and PRAW-6. When we use the same materials and vary the PRAW count, we get flowers with four, five, and six petals (respectively).


I also discuss petal-shaped beads in this video. For this project I chose dragon scale beads in a specific finish that gives us many different colors in one bag of beads, but I've also used lentils, rizos, rose petals, and even drop beads to emulate flower petals with beads.

Quick Petite Earrings


In the next part of the video I show how to make a quick pair of earrings using 5-sided charms with matching pear-shaped crystals. I also cover how to balance the earrings so that the flower faces forward.


Delicate Bracelet


In the last part of the video I show how to make a matching bracelet using 4-sided charms, including how to connect them together and how to attach a magnet clasp.


Once you're comfortable making these charms and connecting them together, try creating a collection of charms using a different number of sides. You can mix and match and connect them together to make more intricate necklaces, bracelets, and earrings!

This video is available both as a High Definition Video Download and in the DVD format, and includes a supplementary PDF pattern with step-by-step written instructions and a complete materials list for the bracelet and purple pair of earrings shown in this post. Additionally, a special limited edition kit is also available for this project, and it includes the video download, the PDF, as well as all the beads needed to make the bracelet and earrings shown here. The last time I partnered with Interweave to sell a kit it completely sold out, so you won't want to miss your chance to snag this one!

Thanks for looking!

Beaded Bead Reflection Photography

$
0
0
I've been playing with photographing some of my beaded beads on a reflective surface.


It's a fun but challenging photography technique and I think it works particularly well for silver beadwork. I used a piece of dark reflective plastic to generate the reflection, which does the job quite nicely however it also picks up every single speck of dust in the light tent. I had to spend a ton of time editing out the dust specks in post-processing to generate these shots.

Here's a shot of a Fairy Triangles beaded bead. I like how the reflection picks up the lower part of the beaded bead as well as the top.


Here's another shot of the silver Half Tila Technocluster beaded bead, which I previously tried to photograph in a previous post.


For reference, here's my previous attempt at photographing this beaded bead. The big difference is in the reflective surface; in the older shot I used a clear piece of plastic to generate the reflection (instead of a dark piece of plastic), but since both the top and bottom sides of the clear plastic show, it makes a double reflection rather than a single reflection.


I like the reflection in the new shot, but the beaded bead is a little overexposed. I prefer the way the beaded bead looks in the older photo.

Finally, I used this same technique to photograph the Diffractions Necklace, which is the project that I'll be teaching at the Beading by the Bay bead retreat in March of 2016.


This necklace features both cube- and dodecahedron-shaped beaded beads that use a unifying set of materials and embellishments, and I'm looking forward to teaching this project because it's a great example of beading with different geometries to make different types and sizes of beaded beads.

Thanks for looking!

New Pattern and Kits: Star Fragment Pendants

$
0
0
I finished my latest beading pattern, the Star Fragment Pendants.


Coiled Cubic Right-Angle Weave


Over the past several months I've been quietly working on this new variation on CRAW. It's an idea that originated from several places; most importantly it builds on Gwen Fisher's Twisted CRAW technique, though I recently dived through my old photos and prototypes and found related bits of beadwork dating back to 2008 (!). I started exploring this concept in earnest after taking a four-day class with David Chatt, where he encouraged me to explore versions of RAW and CRAW that twist and spiral.

That was last January, and since then I've beaded a whole box of beadwork ranging from promising experimental samples to quite ugly (but educational) failures to satisfying pieces of finished jewelry. It's been quite an artist's journey for me, full of both joy and disappointment, confusion and gradual understanding, and a whole lot of hard work. I'm looking forward to telling this story further as I present more of this beadwork, but for now I'll focus on the first design out of that box.

CRAW That Twists and Coils


The Star Fragment Pendants feature this CRAW variation that not only twists in the style of Gwen Fisher's technique, but also coils like an old-fashioned telephone cord. While others have explored these ideas with embellishment and bead size strategies, the twist of this version is generated by the specific thread path of the stitch. Like CRAW, coiled CRAW can be embellished and made into components, and the same ideas also apply to prismatic right-angle weave.


The beading pattern for this design describes how to make two different sizes of Star Fragment Pendants from embellished coiled CRAW components. In the pattern I explain the similarities and differences between CRAW, twisted CRAW, and coiled CRAW, and I introduce terminology to describe the unique features of the stitch. The pattern is in the PDF format and clocks in at 22 pages and 85 full-color illustrations and photographs. I classify this pattern as advanced and it's most appropriate for experienced beaders who have mastered CRAW and are ready for the challenge of learning this new variation. Though to be honest, I find the action of stitching twisted and coiled CRAW easier than traditional CRAW, but it's difficult to wrap one's brain around the subtle intricacies of coiled CRAW structures if you haven't already mastered CRAW.

Small and Large Star-Shaped Pendants


This design uses a collection of traditional beads; Japanese seed beads, round beads, fire polish beads, and bicone crystals. The petite pendant features one component, while the large one features two components in two different sizes. The components stack and join in an offset way that's a little tricky to assemble, but I like how this substantial component has such dimension and texture, and I'm quite happy that it also has negative space in the center (a concept that I frequently struggle with).


Kits for this design are available in three different colorways and include all the beads needed to make both pendants, though at the time of this writing the bronze colorway is currently sold out (I'm in the process of re-stocking this colorway, so check back soon for updated availability). Both pendants look lovely strung either separately or together on a silk ribbon.


Thanks for looking!

New Pattern and Kits: Opulent Deltahedra Set

$
0
0
I wrote up a beading pattern for the Opulent Deltahedra Set!

Beaded Beads with Triangle Weave


You may have recognized this project from a 2015 issue of Beadwork Magazine; the Opulent Octahedron Necklace was one of my six Designer of the Year projects for 2015. These beaded beads use the geometry of the octahedron and a variation of triangle weave to make these sparkly, self-supporting beaded beads.


Five beaded beads pair with shiny crystal pearls and additional crystals for an elegant necklace:


Matching Pendant and Earrings


While I'm quite partial to the geometry of the octahedron (especially for beaded beads!), the great thing about triangle weave is that you can use it to create an infinite number of geometric objects made up of equilateral triangles. One of these objects is the icosahedron, which is made up of 20 triangles instead of eight. The Opulent Icosahedron makes a substantial beaded bead that's the perfect size for a pendant.


Additionally, a single triangle unit pairs with pear-shaped crystals for an easy, elegant pair of matching earrings.

Several Variations


The 3D shapes that can be made up only of equilateral triangles are called the deltahedra. While there are an infinite number of deltahedra (some of which feature quite cool star-shaped points), there are only eight that are strictly convex. I beaded all eight of them using the same technique that I used to make the Opulent Octahedron and Icosahedron. They make a collection of interesting structures that offer intriguing possibilities for further jewelry designs.


The beading pattern for this design includes complete written instructions on how to weave the Opulent Octahedron, the Opulent Icosahedron, and the matching Opulent Earrings. Additionally, I included several pages of variations showing photos and descriptions of all eight convex Opulent Deltahedra. The pattern is in the PDF format and clocks in at 26 pages and 89 full-color illustrations and photographs. I classify this pattern as intermediate and it's most appropriate for beaders who have already tried triangle weave and who would like to learn several possible ways to create 3D beaded beads with this stitch.


Kits for this design are available in three different colorways and in two different configurations; the Opulent Octahedron necklace kit makes one necklace with five Opulent Octahedron beaded beads, and the Opulent Icosahedron and Earrings kit makes one Opulent Icosahedron beaded bead that can easily make a pendant, and one pair of matching earrings. Each kit contains all the beads and findings needed to complete the project.

Thanks for looking!

Prism Blossoms Pendant for the Spring

$
0
0
The other day I wove a new Prism Blossoms Pendant to celebrate the first day of spring. I used some new colorful metallic Dragon Scale beads that I picked up from Beki at Out on a Whim when they were exhibiting in San Diego.

A photo posted by Cindy (@beadorigami) on


(By the way, I'm on Instagram, where I like to post candid shots of what's on my bead board, and also cats).

I wanted to pair these beads with the new opaque Duracoat seed beads from Miyuki. I had been anticipating the release of these new beads ever since they showed off samples at the 2015 Bead & Button Show. Fortunately they shipped just in time for spring and they should be arriving at your favorite bead retailer soon.

A photo posted by Cindy (@beadorigami) on


I'm quite happy with how the pendant turned out!


Kits for this colorway are available at www.beadorigami.com, and contain all the materials needed to weave the finished pendant.

Thanks for looking!

New Pattern and Kits: Comet Trails Set

$
0
0
I've finished my next beading pattern, the Comet Trails Lariat and Earrings Set!


Beaded Beads with 2-Hole Crescents


I received a few packages of 2-hole crescent beads and 2-hole bar beads as part of Starman's Trendsetter program. After playing with them for a while I gravitated towards incorporating them into beaded beads, and I experimented with using them in geometric beaded bead embellishments. I couldn't decide whether to stick with bars or crescents for these embellishments, so I ended up using both for two different sets of spiky beaded beads. A lariat proved to be the ideal format to show off both versions.

Like the 2-hole triangles, the crescent beads have an "up" side and a down side that influences how they will orient themselves in the finished piece. I experimented with both orientations, but in this design the crescents preferred an outward orientation that gives the beaded bead a spiky look.


A Long Hubble Stitch Rope


I have a confession... Until I wove this piece, I didn't think I'd get into Hubble Stitch. Developed by Melanie de Miguel, this lacy, open weave is a cousin of right-angle weave and is reminiscent of a three-bead picot. I'd seen several lovely examples of this stitch from not only Melanie but also from Cynthia and Marcia, and I'd even made a few basic samples using the stitch, but I didn't initially see how it could be incorporated into any of my designs.

However, I noticed that the triangle shape formed by three-up Hubble looked like the seed bead embellishment in these beaded beads, so I set out to replicate that embellishment in a rope using Hubble stitch. The result is an extended variation, and by the definitions shown in Let's Hubble, it's an offset, four-up, tubular Hubble rope with periodic horizontal spaced out 2-hole beads. I like how this rope is light and lacy, but most of all how well it complements the beaded beads.


Matching Earrings


A pair of the smaller beaded beads make quick and easy matching earrings.


Three Colorways


Starman is continuously developing new colors and finishes for their beads, and it's quite fun to explore different colorways with this design.


The beading pattern for the Comet Trails Set includes complete written instructions on how to weave each component of the lariat, how to attach the components together, and how to weave the matching earrings. The pattern also includes a few images of the prototype pieces of beadwork that led to this design. Like the lariat, this pattern is on the long side; it's in the PDF format and clocks in at 30 pages and 117 full-color illustrations and photographs. I classify this pattern as intermediate, and it's most appropriate for beaders who have previous experience with beaded beads and who would like to learn a new way of creating them with 2-hole beads. Knowledge of Hubble Stitch is a plus but it isn't required to follow this pattern.

Kits for this design are available in three different colorways and make the completed lariat measuring up to 34" long, along with a pair of matching earrings. Each kit contains all the beads and findings needed to complete the project.

Thanks for looking!

Succulent Topiary Pendant

$
0
0
I wrote a new beading pattern.


The Succulent Topiary Pendant features a whole bunch of shaped beads all woven together in a geometric floral pendant. This advanced beading pattern teaches you how to stitch the finished pendant.


When I set out to stitch this design, I wanted to play with some Tulip Petal beads that had been sitting in my stash for a couple of years. I didn't intend to use so many shapes to stitch these little beaded flowers and bits of greenery, but as I worked I found that a collection of Rizos, Gekkos, drops, and Spiky Buttons complemented the floral Tulip Petals. Oddly enough, by the time I finished the flowers didn't look much like tulips, but they do remind me of cactus flowers.


It's a relative of the Tila Garden Pendant. Both designs use shaped beads and Tilas on their edges, and both have dodecahedral symmetry, but the Tila Garden uses the geometry of a standard dodecahedron while the Succulent Topiary uses that of an icosidodecahedron. You can think of it as a dodecahedron with 20 added triangles. The Succulent Topiary Pendant is also quite a bit bigger.


The beading pattern clocks in at over 20 pages and 60 photos and illustrations. Kits are available in two colorways and contain all the beads needed to stitch the finished pendant.

Thanks for looking!

Astral Spore Pendant

$
0
0
My newest beading pattern is now available.


The Astral Spore Pendant features the new Quarter Tila Bead in this very tactile, geometric pendant. It uses four colors of Quarter Tilas and a whole bunch of bugle beads and round seed beads, and it's hollow and self-supporting so you can see right through it. This beading pattern is an advanced design, and it teaches you how to weave the finished pendant.


Like the Succulent Topiary Pendant, this design uses the geometry of an icosiedodecahedron, which is like a dodecahedron but with 20 extra triangles. In this design I've embellished each of the 12 pentagons so that they stick out from the base. I've also attached a tassel-like set of matching fringe containing Czech etched dagger beads in colors that just make me swoon. The whole design reminds me of something from astronomy, like a comet, but I already have a design that has "comet" in its name (I'm going to run out of names someday!). But it also reminds me of a grain of pollen, so it's the Astral Spore Pendant.

This is actually my third attempt at stitching a geometric design with Quarter Tilas; the first two attempts were a little smaller, and the smallest one was harder to stitch than this design. The pattern contains a few photos of the smaller attempts.


The beading pattern is 24 pages long and contains 70 photos and illustrations. Kits are available in the three colorways pictured, and contain all the beads needed to stitch the finished pendant.

Thanks for looking!

Shimmer River Bracelets

$
0
0
A few months ago I made a new set of bracelets, the Shimmer River Bracelets.


The Shimmer River Bracelets feature a whole bunch of Swarovski's "shimmer" fallback crystals, along with either Toho's Demi Round seed beads or Miyuki's Spacer seed beads. These thin beads are available in two sizes and are half the width of traditional 8° and 11° Japanese seed beads.

I've noticed differences between Toho and Miyuki brands before. True to form, there are subtle size and color differences between Demi Round and Spacer beads too. But I was able to use them interchangeably in this design.


When I first set out to stitch this design, I wanted to show off the crystals without covering them up or overshadowing them with other beads. This design was actually my first attempt at this idea, but then I stitched another bracelet that used and exaggerated different beaded elements. Unfortunately, the crystals were lost in this second attempt, so I circles back to my original idea. Sometimes simplicity is better and less is more!


It works up so quickly that I stitched it in five different colorways!


The beading pattern for this bracelet is appropriate for advanced beginners. The pattern is 12 pages long and contains 37 photos and illustrations.


Kits are available in all five colorways pictured, and contain all the beads needed to stitch the finished bracelet (extra crystals and beads are included so you can make a bracelet longer than those shown here).

Thanks for looking!

Shimmer River Earrings

Snowflakes and Hearts with CRAW and PRAW

$
0
0
Over the past couple of months I released a couple of patterns using CRAW and PRAW. Lately, my designs seem to use either shaped beads and two-hole beads, or just seed beads. These designs are firmly in the seed bead camp.

Snowflake Pendant


You need only a handful of seed beads and a needle and thread to stitch the Snowflake Pendant. This pendant features several units of CRAW and PRAW stitched side-by-side to create the finished snowflake. The concept behind this pendant actually goes back to my original experiments with PRAW, though I only recently managed to show how to stitch these units side-by-side.

Large and Small Snowflakes


The pattern shows how to stitch the finished snowflake pendant as well as smaller and larger variations. You can also use just one color of seed beads for a sleeker look. The full pattern is 19 pages long and contains 66 full color illustrations and photographs.


Peace and Double Hearts


My next creation with these stitches is two-in-one design. The Peace and Double Hearts Pendants use the same CRAW and PRAW stitches to create two types of beaded hearts. One is a heart within a heart, and the other is a combination of a heart with a peace sign.


The Peace Heart came about after I combined Gwen's Sweetheart Pendant with Marcia's Peace Sign pendant. It was actually the last piece of beadwork I created before Sophie was born, but it took me a while to carve out the time to write its pattern.


The full pattern is 30 pages long and contains 128 full color illustrations and photographs. I classify both patterns as advanced as I don't cover the basic CRAW stitch in detail. However, if you are experienced with CRAW and you're up for the challenge of stitching these shapes, these patterns are for you!


Thanks for looking!

Thanks for visiting my blog! Please subscribe to my mailing list for updates on the latest and greatest Bead Origami news!

New(ish) Pattern and Kits: Yukiwariso Necklace

$
0
0

I released a few new patterns in this past year. This one is the Yukiwariso Necklace.


This light and delicate necklace gets its name from hepatica japonica, a rare woodland plant native to Japan which produces a beautiful variety of early-blooming flowers. Designed for the Japanese publication Bead Art & Embroidery, this necklace features a light, airy style that embodies Japanese beaded jewelry.


The full pattern is 16 pages long and contains 47 full color illustrations and photographs. It's an advanced beginner project, so if you're just getting into beading, this is a great third or fourth project to try. 


Kits for this project are available in five colorways, and contain all the beads and findings needed to stitch the complete necklace. 


Thanks for looking!

Thanks for visiting my blog! Please subscribe to my mailing list for updates on the latest and greatest Bead Origami news!

Annual Holiday Wreath, 2020 Edition

$
0
0

Every year I decorate a large wreath with a collection of beaded beads and pendants. I like to start by putting them in a big pile.


Sometimes I like to organize them by design or style. This year I loosely organized them by color.


Seeing all of these pieces together is a nice reminder of what I've done over the past few years. A couple of seed beads in a small piece doesn't always feel like a big accomplishment, but when you do that over and over again over a long period of time, the results really add up!


If you'd like to decorate your own wreath, make sure to exclude any piece that contains sterling-silver plated seed beads, as the silver will tarnish more quickly if it sits on a fresh wreath. Or do as I do, and decorate your wreath, take a picture, and then remove those pieces immediately afterward.

I hope that you and your loved ones have a peaceful and safe holiday season. 


Thanks for looking!

Thanks for visiting my blog! Please subscribe to my mailing list for updates on the latest and greatest Bead Origami news!
Viewing all 139 articles
Browse latest View live